
blueberry crumble recipe
The Best Blueberry Crumble Recipe You’ll Make Again and Again
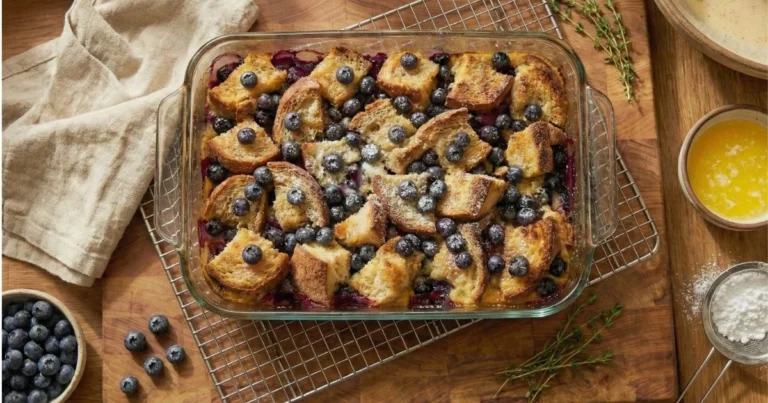
Juicy blueberry filling, buttery golden topping, ready in under an hour.

Blueberry Crumble Recipe
Ingredients
Method
- Preheat oven to 375°F (190°C). Mix blueberries, sugar, cornstarch, lemon juice, zest, vanilla, and salt. Transfer to baking dish.
- Combine oats, flour, sugar, cinnamon, and salt. Rub in cold butter until crumbly.
- Sprinkle topping over filling and bake for 40–45 minutes until golden and bubbling.
- Let rest for 15 minutes before serving. Enjoy warm.
There’s something about the smell of bubbling blueberries in the oven that instantly feels like home. That warm, jammy scent drifting through your kitchen on a quiet afternoon, it’s the kind of thing that makes everything slow down a little.
If you’ve ever wanted to make a dessert that looks impressive but is secretly one of the easiest things you’ll ever bake, this blueberry crumble recipe is exactly that. No rolling pins. No pastry skills. No stress. Just a handful of pantry staples, a bowl, and about 15 minutes of hands-on time.
Whether you’re baking for a dinner party, a lazy Sunday, or just because you have a bag of blueberries and a craving, this recipe delivers every single time. By the end of this, you’ll have a go-to dessert that you’ll reach for all year long.
Why This Blueberry Crumble Recipe Works Every Single Time
Before we dive into the kitchen, let’s talk about what makes a crumble a crumble. You’ve probably heard the terms crumble, crisp, and cobbler tossed around, and yes, they’re actually different things.
A crumble has a simple streusel-style topping made with flour, butter, and sugar. A crisp usually includes oats (though many crumble recipes do too). A cobbler has a biscuit or cake-like topping. For this recipe, we’re doing a crumble with oats because the oats add that extra crunch and heartiness that makes every bite truly satisfying.
What makes this particular blueberry crumble recipe shine is the balance of three things: a juicy-but-not-watery filling, a topping that crisps up beautifully without burning, and just enough lemon brightness to cut through the sweetness. Plus, and this is the best part, you absolutely do not need any fancy equipment or pastry experience to make it work. If you can stir and sprinkle, you’ve got this.
Ingredients for Blueberry Crumble (Simple Pantry Staples!)
This recipe serves 6 and bakes in a standard 8×8 inch baking dish. Here’s everything you’ll need, split into two easy groups.
For the blueberry filling:
- 4 cups (600g) fresh or frozen blueberries
- 3 tablespoons granulated sugar (adjust based on how sweet your berries are)
- 1 tablespoon cornstarch
- 1 tablespoon fresh lemon juice
- 1 teaspoon lemon zest
- 1 teaspoon vanilla extract
- Pinch of salt
For the golden crumble topping:
- 1 cup (90g) rolled oats (old-fashioned, not instant)
- ¾ cup (95g) all-purpose flour
- ½ cup (100g) packed light brown sugar
- 6 tablespoons (85g) cold unsalted butter, cut into small cubes
- ½ teaspoon ground cinnamon
- Pinch of salt
Tip: Frozen blueberries work beautifully here, no need to thaw them first. Just add them straight from the freezer. You may need to bake for an extra 5 minutes if using frozen.
Looking for more ways to use blueberries? Check out this Easy Blueberry Compote Recipe.
How to Make Blueberry Crumble: Step-by-Step
Ready? Let’s do this. Preheat your oven to 375°F (190°C) and lightly grease your 8×8 inch baking dish.
Step 1 — Prepare your blueberry filling
Toss your blueberries into a large bowl. Add the sugar, cornstarch, lemon juice, lemon zest, vanilla extract, and a pinch of salt. Gently stir everything together until the berries are evenly coated.
The cornstarch is your secret weapon here, it soaks up the blueberry juices as they cook and turns them into a thick, glossy sauce instead of a watery puddle. Don’t skip it! Pour the filling into your prepared baking dish and spread it out evenly.
Step 2 — Make the crispy crumble topping
In a separate bowl, combine the oats, flour, brown sugar, cinnamon, and salt. Stir together with a fork.
Now add your cold butter cubes. Here’s where a little patience pays off: use your fingertips to rub the butter into the dry ingredients until you get a mixture that looks like rough, clumpy sand with some pea-sized bits of butter scattered throughout. Those little butter chunks are exactly what you want, they’re what create that golden, flaky, crispy topping.
Tip: The butter must be cold. If it warms up too much while you work, pop the bowl in the fridge for 10 minutes before continuing. Warm butter = greasy topping instead of crispy.
Step 3 — Assemble and bake to golden perfection
Scatter the crumble topping evenly over the blueberry filling. Don’t press it down, just let it sit loosely on top. This is what helps it crisp up rather than steam.
Bake in your preheated oven for 40 to 45 minutes, until the topping is deep golden brown and you can see the blueberry filling bubbling up around the edges. That bubbling is your signal that the filling has thickened up properly, it’s a beautiful sight.
Tip: If your topping looks pale at the 35-minute mark, that’s completely normal. Give it the full 45 minutes and resist opening the oven too early.
Step 4 — Rest, serve, and enjoy!
This is the hardest part: let your crumble rest for at least 15 minutes before serving. It might feel like torture, but it’s worth it, the filling needs this time to set up so it’s scoopable rather than soupy.
Serve warm, straight from the dish, with a generous scoop of vanilla ice cream or a dollop of whipped cream. Pure happiness.
Tips for the Juiciest Blueberry Filling
Fresh vs. frozen blueberries — which is better?
Honestly? Both work wonderfully in this blueberry crumble recipe, and your choice mostly comes down to what’s available and what time of year it is.
Fresh blueberries give you a slightly brighter, more vibrant flavor and tend to hold their shape a little better. They’re ideal when blueberries are in peak season, typically June through August.
Frozen blueberries are more convenient year-round, usually more affordable, and they’re picked and frozen at peak ripeness, which means the flavor is still fantastic. They also release more juice when they bake, which can actually make the filling even saucier and more indulgent. Just bake for an extra 5 minutes.
The bottom line: use what you have. This recipe is flexible and forgiving either way.
How to thicken your blueberry filling perfectly
Nobody wants a runny crumble, that gorgeous, scoopable filling is part of what makes this dessert so satisfying. The key is using the right thickener in the right amount.
Cornstarch vs. flour vs. arrowroot
- Cornstarch: Our recommendation. Creates a glossy, clear, thick filling. Use 1 tablespoon for 4 cups of berries.
- All-purpose flour: Works well but creates a slightly cloudier, less glossy filling. Use 2 tablespoons if substituting.
- Arrowroot: A great option for a naturally clear, silky filling. It’s a bit more temperature-sensitive but produces gorgeous results. Use 1 tablespoon, same as cornstarch.
A quick note on sweetness: taste your blueberries before adding sugar. Very ripe, in-season berries are naturally sweeter and may only need 2 tablespoons of sugar. Tart or frozen berries might need the full 3 tablespoons or even a touch more. You’re in charge here, trust your taste buds.
And if you find yourself with extra blueberries and want another way to use them, this recipe pairs beautifully with a homemade sauce: Easy Blueberry Compote Recipe.
Secrets to the Golden, Crispy Crumble Topping
The butter temperature trick that changes everything
This is the single most important tip for a perfect crumble topping: your butter must be cold. Not room temperature. Not slightly softened. Cold, straight from the fridge, cut into small cubes.
Here’s why it matters: when cold butter hits the heat of the oven, it releases steam before it melts completely. That steam creates tiny pockets of air in the topping, which gives you that irresistible crumbly, flaky texture. Melted or room-temperature butter skips this process and produces a denser, greasier topping instead.
If your kitchen is warm or you’re baking in summer, don’t hesitate to refrigerate your topping mixture for 10 to 15 minutes before scattering it over the filling. That small step makes a real difference.
To oat or not to oat? Choosing the right topping texture
Oats in a crumble are completely optional, technically, a traditional crumble topping is just flour, butter, and sugar. But we love adding oats because they add a wonderful chewiness and extra crunch that makes the topping feel more substantial and satisfying.
Old-fashioned oats vs. quick oats — what’s the difference?
Always use old-fashioned rolled oats (not quick oats or instant oats). Old-fashioned oats are thicker and hold their shape during baking, giving you that hearty, textured topping. Quick oats are too finely processed and tend to disappear into the topping and turn mushy. The texture difference is noticeable — trust us on this one.
Tip: To make this gluten-free, swap the all-purpose flour for certified gluten-free oat flour or almond flour in a 1:1 ratio. The topping will be slightly more delicate but just as delicious.
If you love gluten-free baking, you’ll also enjoy this guide: How to Make Gluten Free Bread.
Fun Variations on Classic Blueberry Crumble
Once you’ve mastered the base recipe, it’s so easy to riff on it. Here are a few variations that have become favorites in our kitchen:
Blueberry lemon crumble — bright and citrusy
Double the lemon zest in the filling to 2 teaspoons, and swap 1 tablespoon of the sugar for a tablespoon of honey. The result is a brighter, more fragrant crumble that feels extra fresh and summery. A small pinch of lavender in the topping is optional but absolutely wonderful.
Blueberry peach crumble — a summer favorite
Use 2 cups of blueberries and 2 cups of sliced fresh peaches (peeled). The combination is magical, the peaches add a floral sweetness that pairs beautifully with the blueberries. This is peak summer baking at its best.
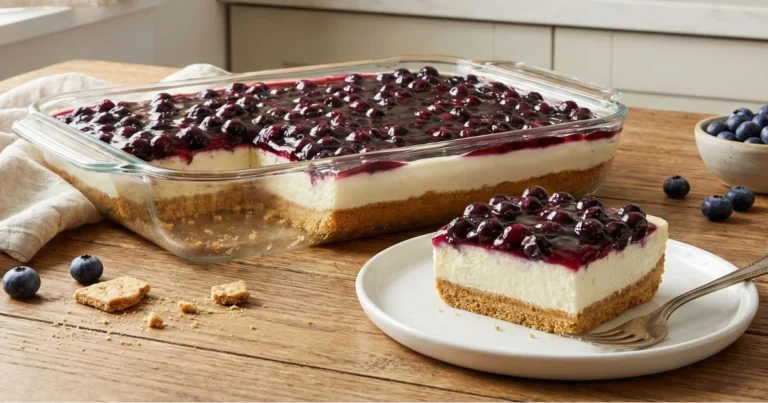
Blueberry cream cheese crumble bars
Spread a thin layer of sweetened cream cheese (about 6 oz softened, mixed with 2 tablespoons sugar and ½ teaspoon vanilla) over the bottom of the dish before adding the blueberry filling. Press half the topping into the base as a crust, add the cream cheese layer, then the berries, then the remaining topping. You get something in between a bar and a crumble, it’s incredible.
If you love blueberry and cream cheese together (and who doesn’t?), you’ll want to try these too:
Healthy blueberry crumble — lower sugar and butter
Reduce the sugar in the filling to 1½ tablespoons and sweeten the topping with 3 tablespoons of maple syrup instead of brown sugar. Swap the butter for coconut oil (keep it solid, not melted). The result is still wonderfully satisfying, with a slightly more complex, caramel-like flavor from the maple.
What to Serve with Blueberry Crumble
Let’s be real, blueberry crumble with a scoop of good vanilla ice cream is one of life’s great pleasures. The contrast of warm, bubbling fruit against cold, creamy ice cream is honestly hard to beat.
But if ice cream isn’t your thing (or you’re looking for something a little lighter), here are some equally delicious options:
- Freshly whipped cream, simple, classic, perfect
- Crème fraîche,slightly tangy and sophisticated
- Greek yogurt, great for a lighter, breakfast-adjacent serving
- Vanilla custard, if you really want to go all out
One thing to keep in mind: serve your crumble warm, but not piping hot. Let it rest for 15 minutes out of the oven and it’ll be at the perfect temperature, the filling scoopable, the topping still crisp.
And here’s a little secret: leftover blueberry crumble, stirred into a bowl of Greek yogurt or oatmeal the next morning, is one of the best breakfast upgrades you’ll ever discover.
How to Store and Reheat Blueberry Crumble
Can you make blueberry crumble ahead of time?
Absolutely, and it’s a great idea if you’re cooking for a crowd. You have two options:
- Prepare the filling and topping separately, store them covered in the fridge for up to 24 hours, and assemble just before baking.
- Bake the crumble fully, let it cool completely, and refrigerate it covered for up to 5 days. Reheat individual portions before serving.
For storage at room temperature, a covered crumble will keep well for up to 2 days, though in most households, it doesn’t last anywhere near that long.
Can you freeze blueberry crumble?
Yes! Both unbaked and fully baked crumble freeze well.
To freeze unbaked: assemble the crumble in a freezer-safe dish, cover tightly with plastic wrap followed by foil, and freeze for up to 3 months. Bake from frozen at 375°F, adding about 15 to 20 extra minutes to the bake time.
To freeze baked: cool completely, portion into airtight containers or freezer bags, and freeze for up to 3 months. Thaw overnight in the fridge and reheat in a 325°F oven for about 15 minutes until warmed through and crispy again.
Tip: Always reheat crumble in the oven, not the microwave. The oven restores that golden, crispy topping beautifully. The microwave will make it soft and a little sad.
More Delicious Blueberry Recipes to Try
Loved this crumble? Here are a few more recipes that celebrate blueberries in the most delicious ways, from breakfast to brunch and everything in between.
- If you enjoyed the blueberry and cream cheese variation, the Best Blueberry Cream Cheese Loaf Recipe takes that combination to an entirely new level, moist, tender, and packed with flavor.
- For sourdough lovers, the Blueberry Cream Cheese Sourdough Recipe is a showstopper with that beautiful swirl of cream cheese and jammy berries folded through tangy sourdough.
- If you’re baking gluten-free, How to Make Gluten Free Bread is a wonderfully reliable guide that’ll set you up with all the foundational skills you need.
- For a quick and simple bake, the Simple Banana Bread Recipe with Just 2 Bananas is proof that fewer ingredients often means more delicious results.
- And if you find yourself with more blueberries than you know what to do with, the Easy Blueberry Compote Recipe is ready in 10 minutes and tastes incredible over yogurt, pancakes, or ice cream.
Ready to Bake? Your New Favorite Dessert Awaits
Here’s what makes this blueberry crumble recipe so special: it’s genuinely foolproof. The filling is flexible (fresh or frozen berries, more or less sugar, your choice of thickener). The topping is forgiving (a little rustic and uneven? That’s the charm). And the result is always, always delicious.
Crumbles are one of those rare desserts that feel fancy enough for company but simple enough for a Tuesday night. They’re warm and comforting in the cold months, and light and fruity in summer. They make your kitchen smell like a hug. And they taste even better the next day.
So preheat that oven, grab your blueberries, and go for it. And when you take that first spoonful, warm crumble, melting ice cream, jammy berries, I’d genuinely love to hear how it went.
Drop a comment below and let me know: did you go classic, or did you try one of the variations? Did you sneak a taste straight from the dish before it had rested properly? (No judgment. We’ve all been there.)
Happy baking, enjoy every delicious, crumbly bite.
Frequently Asked Questions
What’s the best blueberry crumble recipe for beginners?
This one! Seriously, a blueberry crumble recipe is one of the most beginner-friendly desserts you can make. There’s no pastry work, no precise temperature monitoring, and very little that can go wrong. If your topping isn’t perfectly golden, give it a few more minutes. If your filling is a little runny, it likely just needs more time in the oven. The steps are simple, the ingredients are forgiving, and the result is always impressive. Just follow this recipe and you’ll be golden, literally.
Can I use frozen blueberries in a crumble?
Yes, absolutely! You don’t even need to thaw them first, just add them straight to your dish frozen. The one adjustment: plan to bake your crumble for an extra 5 minutes, since frozen berries take a little longer to heat through and thicken properly. The flavor is excellent and the texture is just as good as fresh.
Why is my crumble topping not crispy?
There are a few possible culprits. First, check your butter, if it was too warm or melted when you made the topping, it won’t crisp up properly. Second, make sure you’re not pressing the topping down over the filling; it needs to sit loosely so air can circulate. Third, make sure your oven is fully preheated and you’re giving it the full 40 to 45 minutes. If the topping is browning but the filling isn’t bubbling yet, tent the dish loosely with foil and keep baking.
What’s the difference between a crumble and a crisp?
Great question! A traditional crumble topping is made with just flour, butter, and sugar, no oats. A crisp typically includes oats in the topping, giving it a slightly chewier texture. In practice, the terms are often used interchangeably (and plenty of crumble recipes, like this one, include oats). The main thing is that both are distinct from a cobbler, which has a biscuit or cake-style topping rather than a streusel.
Can I make blueberry crumble without oats?
Absolutely. If you prefer a more traditional crumble topping without oats, simply replace the oats with an equal amount of flour (so use 1¾ cups flour total in the topping). The result is finer and sandier in texture, but still delicious and perfectly crispy. Some people actually prefer it this way, it’s a matter of personal taste.
How do I know when my blueberry crumble is done?
Look for two signs: the topping should be a deep golden brown (not pale, not dark, golden), and the blueberry filling should be visibly bubbling up around the edges of the dish. That bubbling tells you the filling has reached the right temperature to thicken properly. If only one of those things is happening, give it a few more minutes.
Can I make this gluten-free?
Yes! Swap the all-purpose flour in the topping for certified gluten-free oat flour or almond flour in a 1:1 ratio. Make sure your oats are certified gluten-free as well (standard oats are often processed in facilities that also handle wheat). The topping will be slightly more crumbly and delicate than the original, but the flavor is just as wonderful. For more gluten-free baking tips, check out: How to Make Gluten Free Bread.
One Comment
Comments are closed.